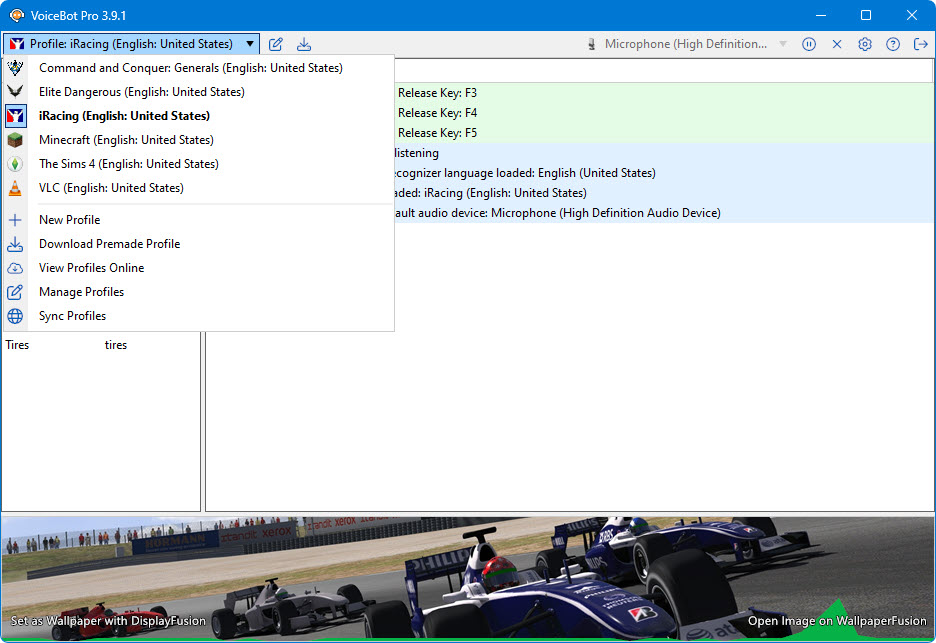
This is the main window of VoiceBot. It contains a toolbar to manage your profiles and VoiceBot settings, a summary of the currently active profile, and a list of recently spoken commands and VoiceBot events.
As well, if the current profile has a linked WallpaperFusion tag, the main window will automatically display high quality images tagged with the profile's tag.
- Profiles: This dropdown menu shows the list of profiles you have installed as well as profile management commands.
- Edit Profile: This button will open the Profile Edit window to allow you to edit the current profile.
- Download Premade Profile: This button will open the Download Profile window to allow you to download and install ready-made VoiceBot profiles.
- Audio Device: This dropdown menu shows the current device that VoiceBot will use to listen to commands as well as a list of enabled audio devices on your system. Selecting a device from this list will change the current default recording device on your computer, which VoiceBot will use to listen for commands.
- Start: This button will start VoiceBot listening to voice commands and changing profiles if the "load profiles automatically" setting is selected.
- Pause: This menu button will pause VoiceBot's listening for voice commands and profile changing.
- Clear Log: This button will clear all the entries in the VoiceBot main window log.
- Settings: This button will open the VoiceBot settings window.
- Help: This button will open your default browser to the VoiceBot Help page.
- Exit: This button will close VoiceBot completely.
- Macro: This column in the left pane lists the name of the macro in the selected profile.
- Command: This column in the left pane lists the word(s) that will trigger the macro in the selected profile.
- Speech: This column in the right pane will list the command (spoken word) that triggered the macro to run.
- Macro: This column in the right pane will list the name of the macro that was run.
- Action: This column in the right pane lists the action that was run by the macro. It may also display general logging messages like "VoiceBot paused."
- Set as Wallpaper with DisplayFusion: If DisplayFusion is running, this button will launch the Displayfusion Load Wallpaper window. This window will allow you to download the current profile image at the correct resolution and set it as your wallpaper with just one click!
- Open Image on WallpaperFusion: This button will open the computer's default web browser to the WallpaperFusion page for the current profile image.
This dropdown shows the currently loaded profile as well as all your installed VoiceBot profiles, and provides options to manage your profiles.
- New Profile: This menu button will open the Profile Edit window with blank settings to allow you to create a new profile.
- Download Premade Profile: This menu button will open the Download Profile window to allow you to download and install ready-made VoiceBot profiles.
- View Profiles Online: This menu item will open the list of downloadable profiles in your default web browser.
- Manage Profiles: This menu button will open the settings window to the Profiles tab to allow you to view and manage your profiles.
- Sync Profiles: This menu button will sync your profiles with the VoiceBot servers if you are logged in to your Binary Fortress account.
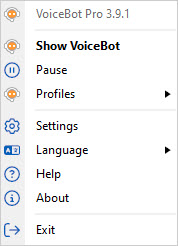
The system tray menu allows you to access most VoiceBot functions directly from the system tray, including pausing, resuming, changing profiles, exiting VoiceBot and more.
- Show VoiceBot: This menu button will open the VoiceBot main window.
- Start: This menu button will start VoiceBot listening to voice commands and changing profiles if the "load profiles automatically" setting is selected.
- Pause: This menu button will pause VoiceBot's listening for voice commands and profile changing.
- Profiles: This menu shows a list of your installed profiles that you can switch to, as well as profile management commands.
- Settings: This menu button will open the VoiceBot settings window.
- Help: This menu button will open your default browser to the VoiceBot Help page.
- About: This menu button will open the VoiceBot settings window to the "About" page, which displays information about VoiceBot and its creators.
- Exit: This menu button will close VoiceBot completely.
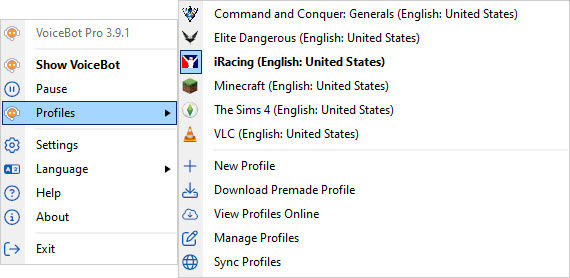
This menu shows a list of all the VoiceBot profiles you have installed, and allows you to load and manage your profiles.
- New Profile: This menu button will open the Profile Edit window with blank settings to allow you to create a new profile.
- Download Premade Profile: This menu button will open the Download Profile window to allow you to download and install ready-made VoiceBot profiles.
- View Profiles Online: This menu item will open the list of downloadable profiles in your default web browser.
- Manage Profiles: This menu button will open the settings window to the Profiles tab to allow you to view and manage your profiles.
- Sync Profiles: This menu button will sync your profiles with the VoiceBot servers if you are logged in to your Binary Fortress account.
This window allows you to configure VoiceBot options, manage and edit your profiles, and more.
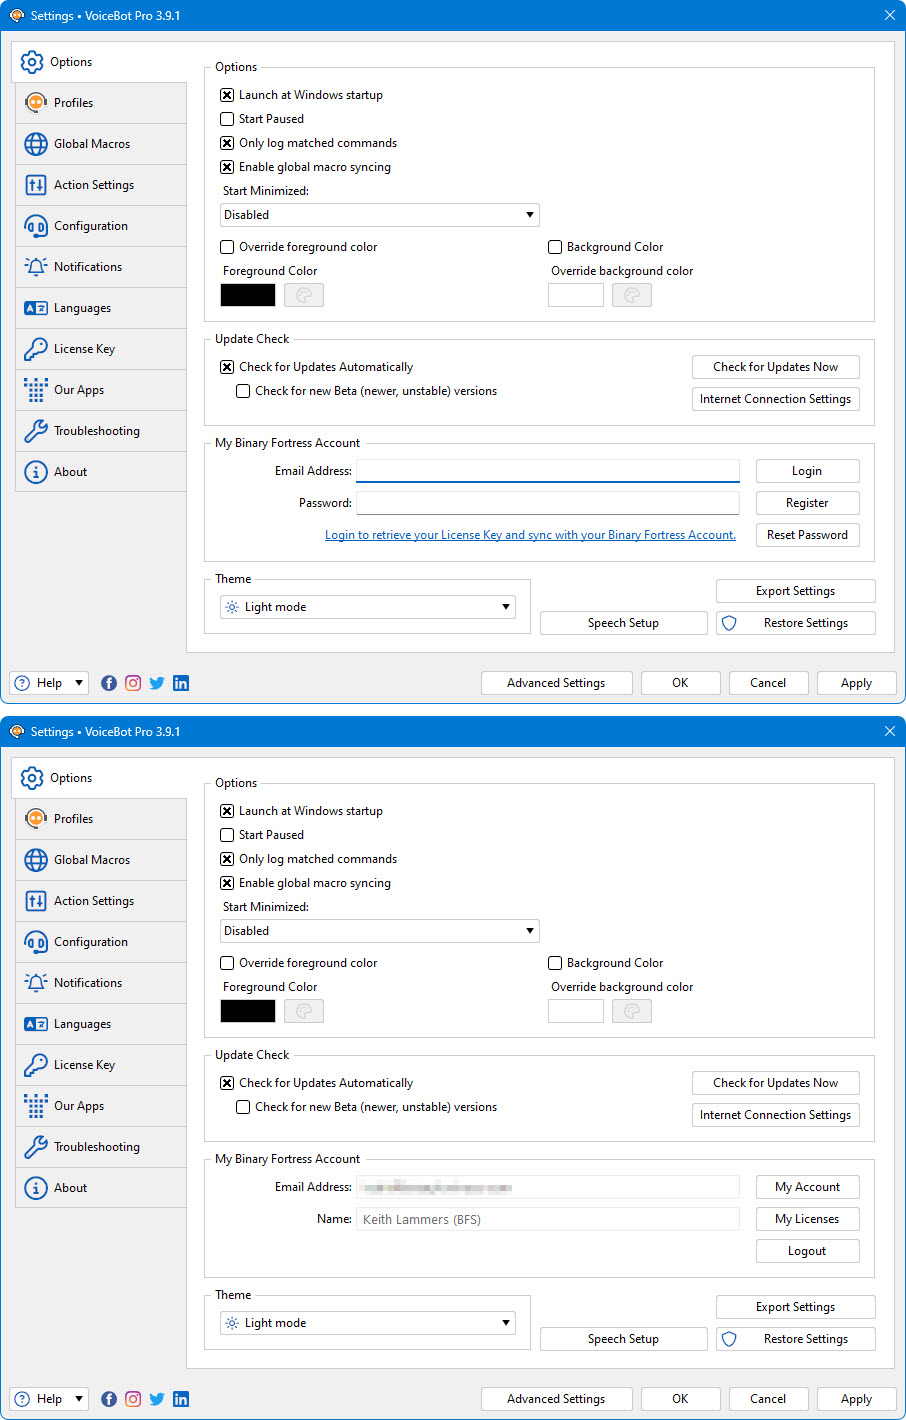
This tab in the Settings window allows you to log onto your Binary Fortress account, check for program updates, and modify application settings.
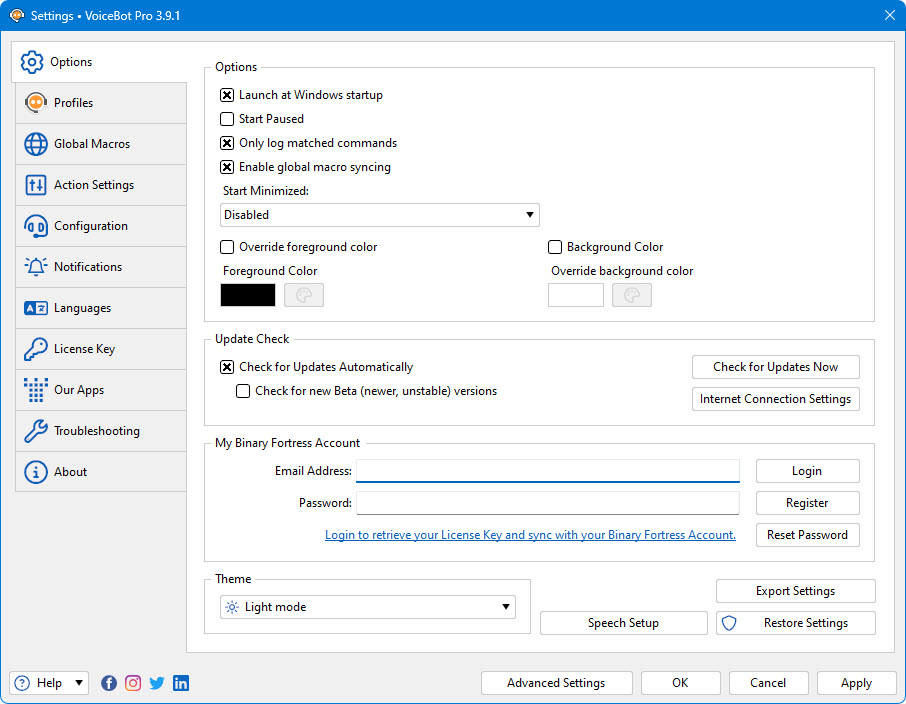
- Launch at Windows startup: Enable this option to have VoiceBot start automatically when Windows starts.
- Start Paused: Enable this option to have VoiceBot start in a paused state.
- Only log matched commands: Enable this to only show recognized commands in the VoiceBot main window log.
- Enable global macro syncing: Enable this option to have the macros on the Global Macros tab sync with your Binary Fortress account.
- Start Minimized: Select whether to start VoiceBot minimized. It can be configured to start minimized to the taskbar or to the system tray with no main window open.
- Override foreground colour: Enable this option if you'd like to select a custom colour for the log text in the main VoiceBot window.
- Foreground Colour: Click this to open the colour picker to choose the text colour for the log text in the main VoiceBot window.
- Background Colour: Click this to open the colour picker to choose the background colour for the log text in the main VoiceBot window.
- Override background colour: Enable this option if you'd like to select a custom colour for the log text background in the main VoiceBot window.
- Check for Updates Automatically: Enable this to let this application periodically check for updates.
- Check for new Beta (newer, unstable) versions: Enable this to let this application check for new Beta versions. This setting is not recommended unless you are interested in testing new software.
- Check for Updates Now: Perform an update check right now.
- Internet Connection Settings: Click this button to open the proxy settings window.
- Speech Setup: This button will open the the Windows Speech Recognition configuration window. You can use this window to configure your microphone, train the speech recognition system to improve recognition accuracy, and more.
- Export Settings: Click this button to export your current application settings to a .REG file. You can use this backup file to import your settings to another machine, or use it to restore your settings if you are re-installing your machine.
- Restore Settings: Allows you to restore your settings from a previously created backup.
- Advanced Settings: Click this button to open the Advanced Settings window.
In the "My Binary Fortress Account" section, you can enter your email address and password to enable easy retrieval of your license key.
- Email Address: Enter the email address for your Binary Fortress Account here.
- Password: Enter the password for your Binary Fortress Account here.
- Login: Enter your email address and password, then click this button to login to your Binary Fortress Account. Once logged in, you can retrieve your license key if needed.
- Register: If you don't already have a Binary Fortress Account, click this button to open the registration page.
- Reset Password: If you've forgotten your password, click this button to open the password reset page.
- Name: When logged in, the name on your account shows here.
- My Account: Click this button to access your account page on the our website.
- My Licenses: Click this button to view and apply your license key.
- Logout: Click this button to logout of your Binary Fortress Account. No items will be synced while logged out.
This tab shows all of your VoiceBot Profiles, and allows you to create, download, share, edit, or delete Profiles.
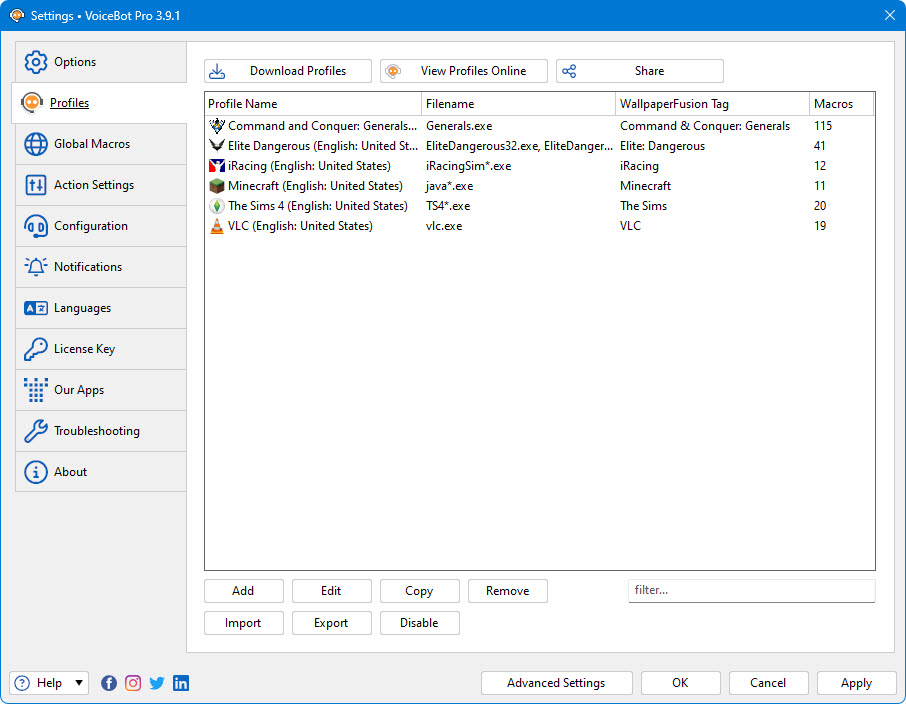
- Download Profiles: This button will open the Download Profile window to allow you to download and install ready-made VoiceBot profiles.
- View Profiles Online: This button will open the list of downloadable profiles in a new web browser window.
- Add: This button will open the Profile Edit window with blank settings to allow you to create a new profile.
- Edit: This button will open the Profile Edit window to allow you to edit the selected profile.
- Copy: This button will open the Profile Edit window with the selected profile's settings copied to allow you to create a new profile based on the selected profile.
- Remove: This button will remove the selected profile(s) from VoiceBot.
- Profile Name: This column shows the profile name.
- Filename: This column shows the filename(s) associated with the profile.
- WallpaperFusion Tag: This column shows the WallpaperFusion tags associated with the profile.
- Macros: This column shows the number of macros in the profile.
- Share: This button will open the Share VoiceBot Profile window to allow you to submit the selected profile for sharing with the VoiceBot community.
- Export: This button will allow you to save the selected profile to your computer. To create a backup of all of your profiles, you can use the "Export Settings" button in the Settings > Options tab.
- Import: This button will allow you to load a previously saved profile from your computer.
- Disable: This button enables and disables the currently selected profile(s). Disabled profiles will be shown in the profiles list, but will not be available for VoiceBot to load.
- Filter: Typing text in this box will filter the list of profiles.
This window allows you to create and edit VoiceBot profiles. It can be accessed via the Add and Edit buttons on the Profiles tab in the settings window.
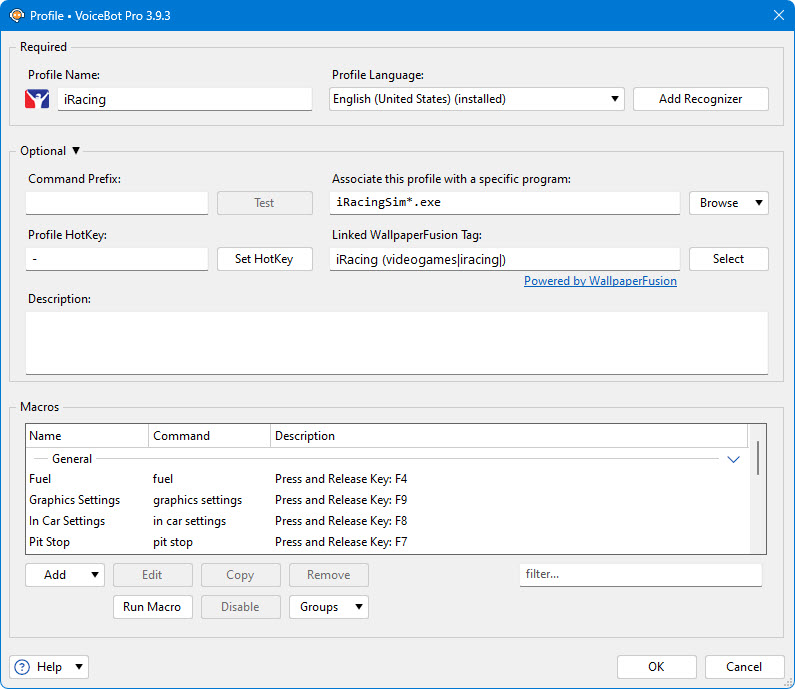
- Profile Name: The name of this VoiceBot profile.
- Profile Language: Use the language dropdown to select the language associated with the current profile. Only languages that have a speech recognizer and are installed on your computer will be listed.
VoiceBot will listen in the selected language when the current profile is active.
- Add Recognizer: This button opens the Windows language options to allow you to install speech recognizer language packs.
- Command Prefix: If a VoiceBot profile has a command prefix set, VoiceBot will listen for that prefix at the start of every command in the profile. This setting will override any global prefix set in VoiceBot options.
- Test: Click this button to test the command prefix to make sure that VoiceBot can recognize it when spoken.
- Associate this profile with a specific program: VoiceBot will use the filename to match this profile with running applications.
You can use * as a wildcard to partially match paths or files.
- Browse: Allows you to select a running application, or browse for an installed application, to associate with this profile.
- Profile HotKey: If a VoiceBot profile has a HotKey set, you can use that key combination from any application to load the associated profile.
- Set HotKey: This button will open the HotKey dialog to allow you to configure a hotkey that will cause VoiceBot to load this profile.
- Linked WallpaperFusion Tag: The WallpaperFusion tag associated with this profile. VoiceBot will use the tag to automatically load images for this profile.
- Select: Opens the Select WallpaperFusion Tag window to select a WallpaperFusion tag for this profile.
- Description: Enter a description for this profile to explain its purpose, add additional information, or differentiate it from another similar profile.
- Macros: The list of macros for this profile.
- Name: This column displays the name of the macro.
- Command: This column displays the voice command(s) used to run the macro.
- Description: This column displays the description or the list of actions for the macro.
- Add: This button will open a menu allowing you to choose to add a new macro, new macro set, or copy a macro from another profile.
- Edit: This button will open the Macro Edit window to edit the currently selected macro.
- Copy: This button will duplicate the currently selected macro and launch the Macro Edit window with the new macro.
- Remove: This button will remove the currently selected macro(s) from the profile.
- Run Macro: Click this button to run the selected macro for testing. This will execute all actions listed in the macro.
- Disable: Disables the selected macro(s) without having to delete them.
- Enable: Enables the selected macro(s).
- Groups: This button provides options to manage macro groups.
- Move To Group: Use this menu option to assign the selected macro(s) to a macro group.
- Filter: Typing text into this box will filter the list of macros in the profile.
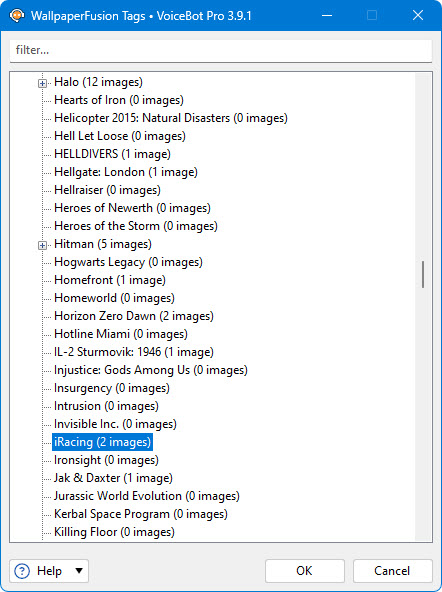
This window displays a list of WallpaperFusion tags that can be linked to the current profile.
This window allows you to create or edit a VoiceBot macro for the current profile. This window is accessed via the Add and Edit buttons in the Macros section of the Profile Edit window.
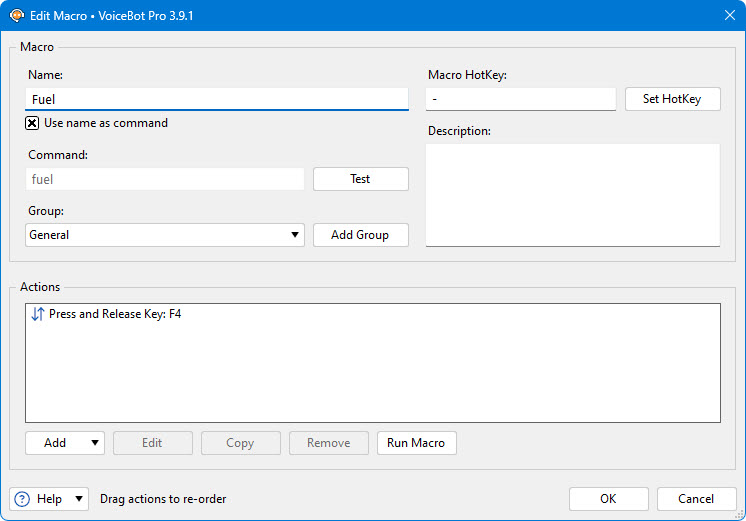
- Name: Enter a name for this macro.
- Use name as command: Enable this option to automatically use the name of the macro as its voice command.
- Command: Enter a voice command that VoiceBot will listen for to run this macro. You can specify multiple commands for the same macro, separated by commas. For example, if you wanted to have one macro that presses the hotkey to open/close a console, you would enter: console, close console. When you say either "console," or "close console," the macro will be run.
- Test: This button opens the Test Command window, where you can verify that VoiceBot will understand the command when you speak it.
- Group: Select a macro group to assign this macro to.
- Add Group: This button will allow you to add a new macro group to the current profile. The macro you are editing will be automatically assigned to the new group.
- Macro HotKey: Binds a HotKey to this macro, which will be usable when the current profile is active.
- Set HotKey: Click this button to set a hotkey for this macro. After applying the settings, you can run this macro using the hotkey in addition to being able to run it via its voice command.
- Description: Enter a description for this macro. This can be useful to summarize the macro's behaviour for macros with scripts or many actions.
- Add: This button will allow you to add a new action to the macro. The actions available are listed in the VoiceBot Actions section.
- Edit: This button will open the appropriate Action Edit window for the selected action.
- Copy: This button will duplicate the currently selected action.
- Run Macro: The run macro button will execute the current macro after a short delay.
- Remove: This button will remove the selected actions(s) from the macro.
These are the actions that you can have VoiceBot perform as part of a macro.

- Press and Release Key: This action presses and releases a keyboard key.
- Press Key: This action presses down a key, without releasing it.
- Release Key: This action releases a held down key that was previously pressed down.
- Toggle Key: This action will either press or release the provided key combination, depending on whether it is currently being held down.
- Hold Key: This action holds a key down for a specified amount of time or repetitions.
- Press and Release Mouse Button: This action clicks the specified mouse button.
- Double Click Mouse Button: This action will quickly click the selected button twice, simulating a mouse double click.
- Press Mouse Button: This action clicks and holds down the specified mouse button.
- Release Mouse Button: This action releases a held down mouse button.
- Move Mouse: This action will move the mouse cursor, either relative to its current position, or to a specific point on the screen.
- Scroll Mouse Wheel: This action will scroll the mouse wheel up or down.
- Change Audio Device: This set of actions will allow you to change your computer's default audio device. VoiceBot uses the default audio devices for listening and playing audio.
- Change Profile: This action will load the selected profile as the current VoiceBot profile. (VoiceBot Pro only).
- Comment: This action does nothing itself. It provides a place for displaying text and providing separation in long lists of actions for complicated macros.
- Delay: This action will cause VoiceBot to wait for the specified time before performing the next action.
- Custom Macro Script: This action runs a customizable script written in C# or VB.NET. To see some of the options available for macro scripts, see the list of functions. (VoiceBot Pro only).
- Download Macro Script: This action downloads a pre-made script from VoiceBot's scripting repository. These functions are provided by the community and verified by the Binary Fortress team before they are made available.
- Open File: This action will open the selected file in its default program.
- Play Sound: This action will play a sound clip in wav format.
- Run Macro from this Profile: This action will execute a different macro from the current profile.
- Start Program: This action will run the specified program.
- Text to Speech: This action will use text to speech to speak a given string of text. To have VoiceBot randomly choose from a group of phrases, separate each phrase with a semicolon or comma.
- Type Text: This action will type out a given string of text.
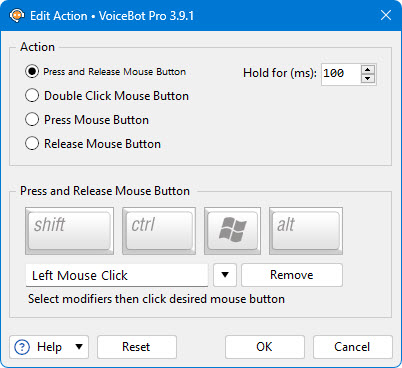
This window will let you create or edit a key press action or mouse click action to perform as part of a VoiceBot macro. This window can be accessed via the Add and Edit (with an Action selected) buttons under the Actions section of the Edit Macro menu. The Edit Macro menu is accessed via the Add and Edit (with a Macro selected) buttons under the Macros section of the Edit Profile menu in the Profiles tab.
- Action: Use the options in this group to select what kind of action VoiceBot should perform.
- Hold for (ms): Enter how long to hold down the selected key or button. Use the default value for a standard keypress or mouse click.
- Remove: Click this button to clear the currently set key or mouse button. This will not clear the selected modifier keys.
- Reset: Clear the action's settings.
This window allows you to create or edit an action that moves the mouse.
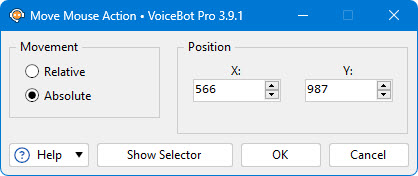
- Movement: The options in the movement group are used to choose how to move the mouse cursor.
- Relative: Select this option to move the mouse based on its current position.
- Absolute: Select this option to move the mouse to a position based on the top left corner of the screen. For example, the top left corner of the screen would be X:0, Y:0
- Position: The X and Y options in the position group are used to set how far to move the mouse cursor.
- X: Sets the horizontal distance (in pixels) to move the mouse. Positive values will move the mouse cursor to the right, and negative values will move the mouse cursor to the left.
- Y: Sets the vertical distance (in pixels) to move the mouse. Positive values will move the mouse cursor down, and negative values will move the mouse cursor up.
- No Acceleration: Select this option to move the mouse cursor ignoring Windows mouse acceleration settings, which can result in more accurate movement. This only applies when using the "relative" option.
- Show Selector: Shows a selector that allows you to click anywhere on the screen and record the X and Y coordinates automatically.
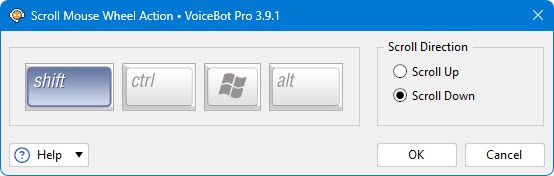
This window allows you to create or edit a mouse scroll wheel action.
- Scroll Direction: Use the scroll options to set whether this action should scroll the mouse wheel up or down.
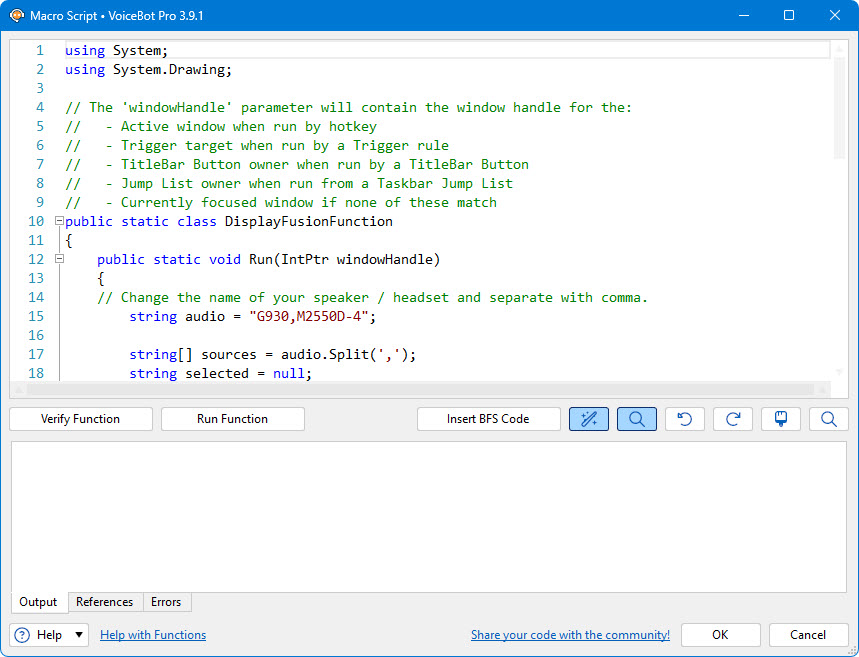
This window allows you to create and edit a Macro Script. Macro Scripts are written in C# or Visual Basic syntax, and using the BFS script functions. This window is shown when adding or editing a Macro Script action in a VoiceBot Macro. Help for the code editor can be found in the
Code Editor section below. The list and descriptions of the available namespaces and functions can be found here:
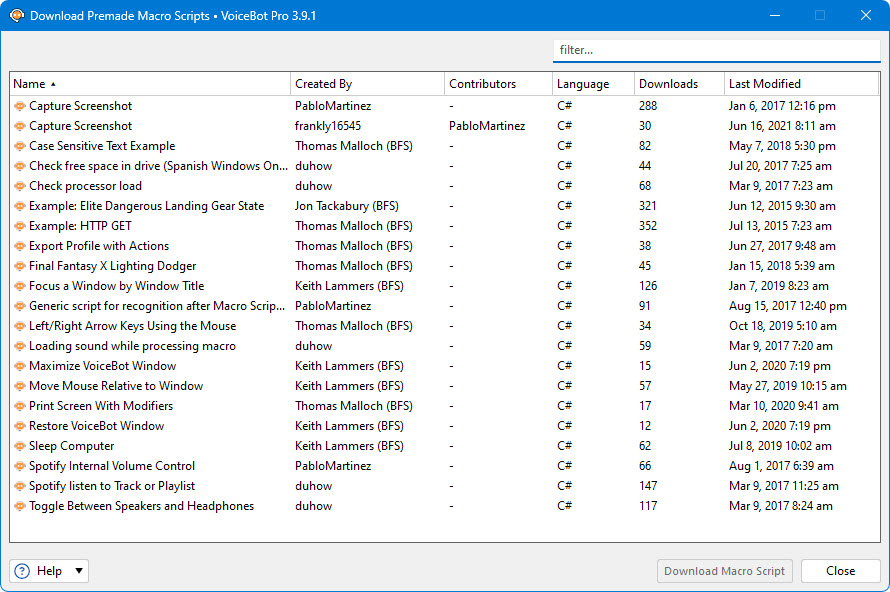
https://www.voicebot.net/ScriptedFunctions/HelpThis window allows you to download premade macro scripts that you can use in your custom profile. These are example scripts, and useful scripts created by the amazing VoiceBot community.
- Name: The name of the script.
- Created By: The name or alias of the person that created the profile.
- Language: The programming language used for the script.
- Downloads: The number of times the script has been downloaded
- Last Modified: The date the script was last modified.
- Download Macro Script: This button will download the selected macro script and allow you to view, edit or save it for use in your custom profile.
- Close: Click this to close the window.
This window allows you to create or edit a text to speech action.
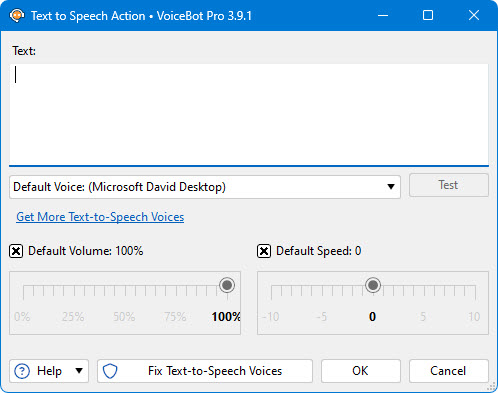
- Text: Enter the text you would like to be spoken in this textbox.
- Voice: This dropdown lists the speech voices available on your computer. The text to speech action will use the selected voice to speak the provided text.
- Test: This button will test the text to speech action by speaking the provided text with the selected voice.
- Get More Text-to-Speech Voices: Load more Text-to-Speech voices from the VoiceBot website.
- Default Volume: Enable this option to use the default volume as set on the Action Settings tab in the settings window.
- Volume: %: This slider adjusts the volume of the Text to Speech playback for this action.
- Default Speed: Enable this option to use the default speed as set on the Action Settings tab in the settings window.
- Speed: This slider adjusts the speed of the Text to Speech playback for this action.
- Fix Text-to-Speech Voices: After you install new Text-to-Speech voices from the VoiceBot website, you need to click this button to fix those voices to work with VoiceBot.
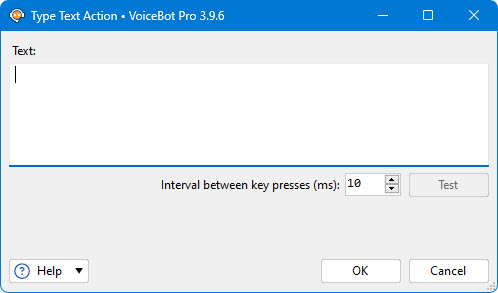
This window allows you to create or edit a Type Text action.
- Text: Enter the text you want to have this action type in this box.
- Interval between key presses (ms): This setting controls how long (in milliseconds) VoiceBot waits before typing the next character.
- Test: Click this button to test the Type Text action. The text will show up in the area below the text box and will appear using the speed you have set in the "Interval between key presses" option.
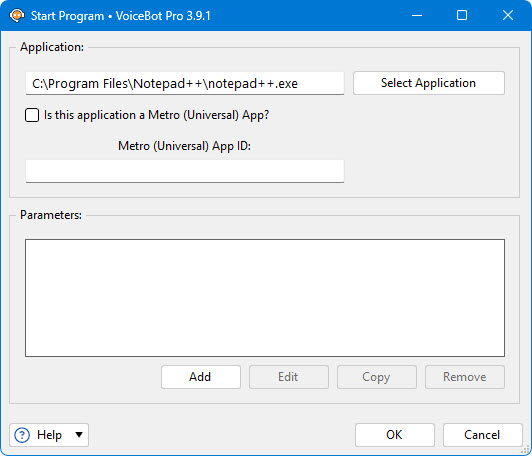
This window alllows you to create or edit a Start Program action.
- Application: The program that will be executed by the action.
- Select Application: Click this button to open the Select Application window.
- Is this application a Metro (Universal) App?: This checkbox needs to be enabled if the shortcut is for a "Universal" (Windows Store) app.
- Metro (Universal) App ID: This shows the processes App ID (or Metro ID).
- Parameters: Any command line parameters that will be passed to the program when it is executed.
- Add: Click this button to add a new command line parameter that will be used when launching this program.
- Edit: Click this button to edit the selected command line parameter.
- Copy: Click this button to duplicate the selected command line parameter.
- Remove: Click this button to remove the selected command line parameter.
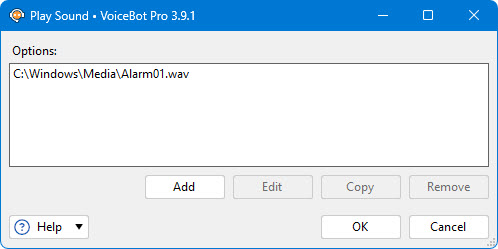
This window allows you to create or edit an action that plays a sound file, or multiple sound files. You can use any sound file that your machine has a codec for.
This window provides a convenient way to create a set of related macros at once. Many games and applications make use of a set of numbered commands.
For example, to change tabs in Google Chrome, you could create a set of macros to press "Ctrl 1", "Ctrl 2", "Ctrl 3", and so on.
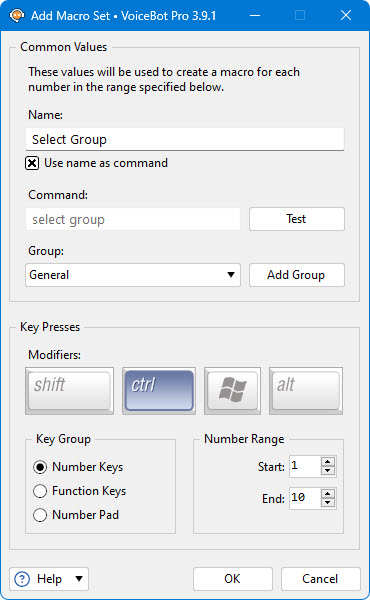
- Name: This text you enter here will prefix the numbered macros that get created.
- Use name as command: The word you enter here will prefix the numbered macros that created. The command you need to speak will be this word, plus the number for the macro.
- Command: This box shows the name of the command prefix for this set, and you can edit it if you disable the "Use name as command" checkbox.
- Test: Click this button to test the command word to make sure that VoiceBot can recognize it.
- Group: This drop-down allows you to select an existing group that the created macros will be assigned to.
- Add Group: Click this button to add a new group if you don't already have one that you want to use in the group drop-down.
- Common Values: Specifiy the values that will form the base of the created macros. For example, using the name and command "Test" would create macros for the number range called "Test [#]" for each number.
- Modifiers: Any modifier keys that should be held as part of the macro.
- Number Keys: The created macros will use the keys on the number row from 1 to 0 (as well as - and =) on the keyboard.
- Function Keys: The created macros will use the keys on the F1 to F12 keys at the top of the keyboard.
- Number Pad: The created macros will use the keys on the number pad on the right of the keyboard.
- Start: The first number that will be used when creating the set of macros. For the "Number Pad" option, this value may start at 0, for the other options, it starts at 1.
- End: The last number that will be used when creating the range of macros. For the "Number Keys" option, you can specify the values of 11 and 12 to correspond to the keys "-" and "=", which lie to the right of the number row on a standard English language keyboard.
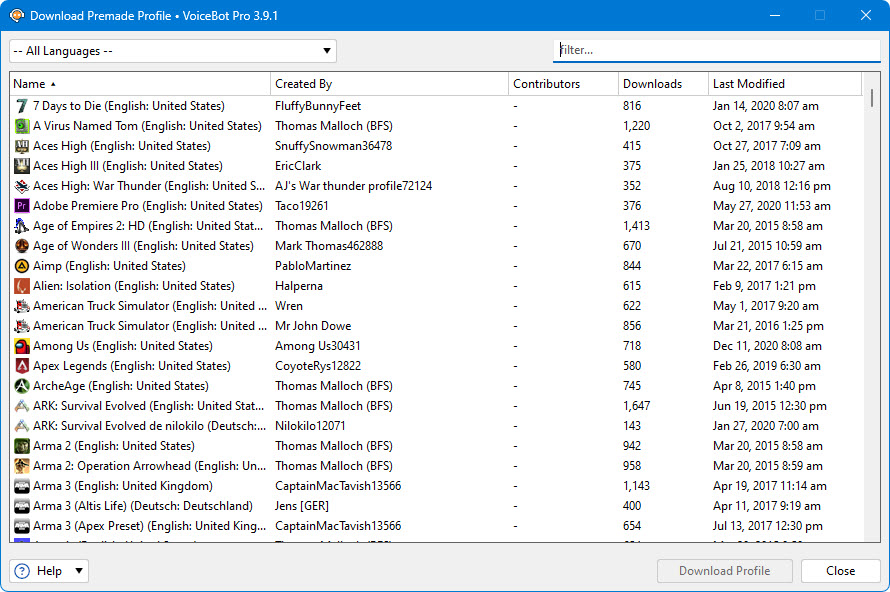
This window displays a list of ready-made VoiceBot profiles available to download and install.
- Name: The name of the profile.
- Contributors: The name or alias of anyone who contributed to the creation of the script. Usually if the script was modified from another script, the original script's creator will be listed here.
- Created By: This column shows the name or alias of the person that created the profile.
- Language: The speech recognition language used by the profile.
- Downloads: The number of times the profile has been downloaded.
- Last Modified: This column shows the last modified date of the profile.
- Download Profile: This button will download and add the selected profiles to VoiceBot and close the profile download window.
- Close: Click this to close the window.
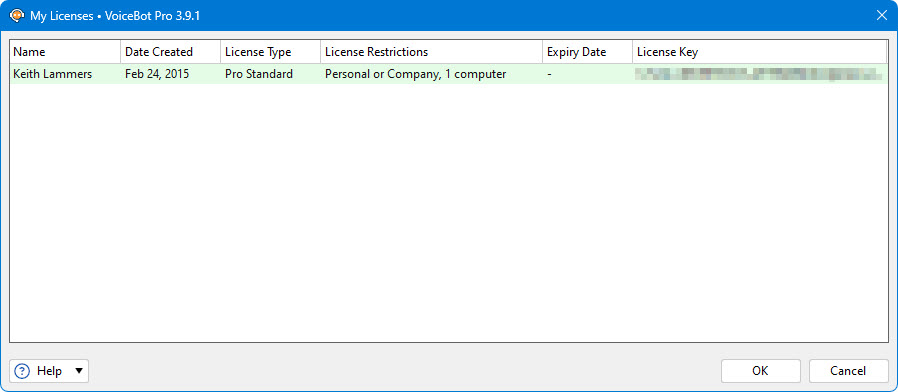
The My Licenses dialog allows you to view and load any license keys that are applicable for this product. If you don't see your purchased license listed, please contact us and we'll help track it down. This dialog can be accessed via the My Licenses button on the Settings > Options tab (when logged in).
- Name: This column displays the name of the user associated with the license.
- Date Created: This column lists the date that each of your licenses was created.
- License Type: This column lists the license type for each of your licenses.
- License Restrictions: This column explains the restrictions for the license type of each of your licenses.
- Expiry Date: This column lists the expiry date (if applicable) for each of your licenses.
- License Key: This column displays the license key.
This tab in the settings window contains a list of macros that VoiceBot will execute regardless of which profile is currently active.
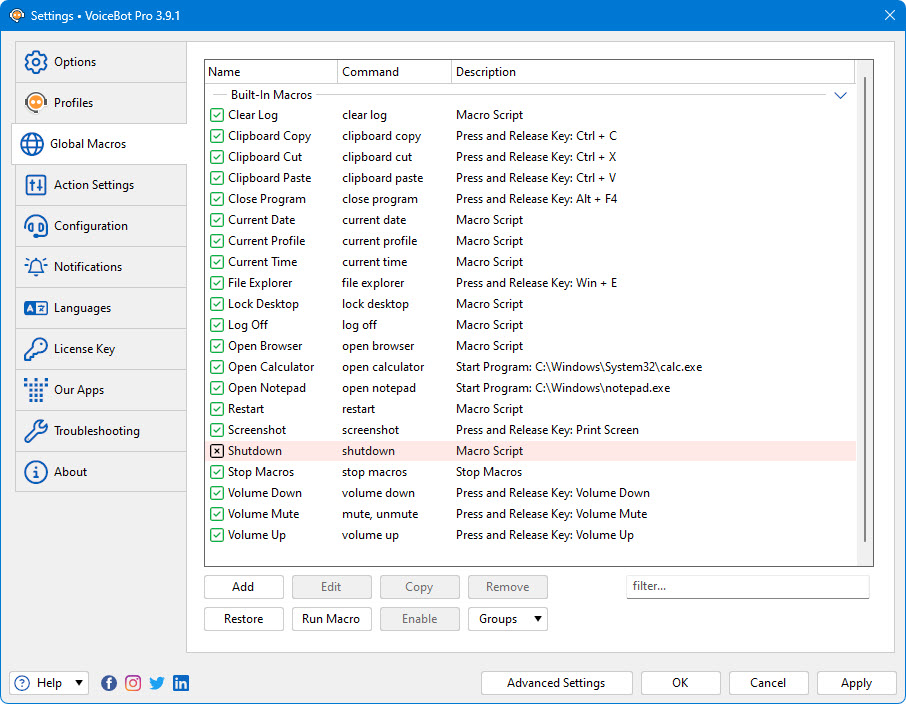
- Name: This column displays the name of the macro.
- Command: This column displays the voice command(s) used to run the macro.
- Description: This column displays the description of the macro if it has one.
- Add: This button will open the Macro Edit window to create a new macro.
- Edit: This button will open the Macro Edit window to edit the currently selected macro.
- Copy: This button will duplicate the currently selected macro and launch the Macro Edit window with the new macro.
- Remove: This button will remove the currently selected global macro(s).
- Enable: Enables the selected macro(s).
- Run Macro: Click this button to run the selected macro for testing. This will execute all actions in the macro.
- Restore: This button will restore any missing or deleted default global macros. Any macros that you have created or modified will not be affected.
Note: restoring your global macros will reset the group of any existing default macros.
- Groups: This button provides options to manage global macro groups.
- Disable: Disables the selected macro(s) without having to delete them.
- Filter: Typing text in this box will filter the list of macros on this tab.
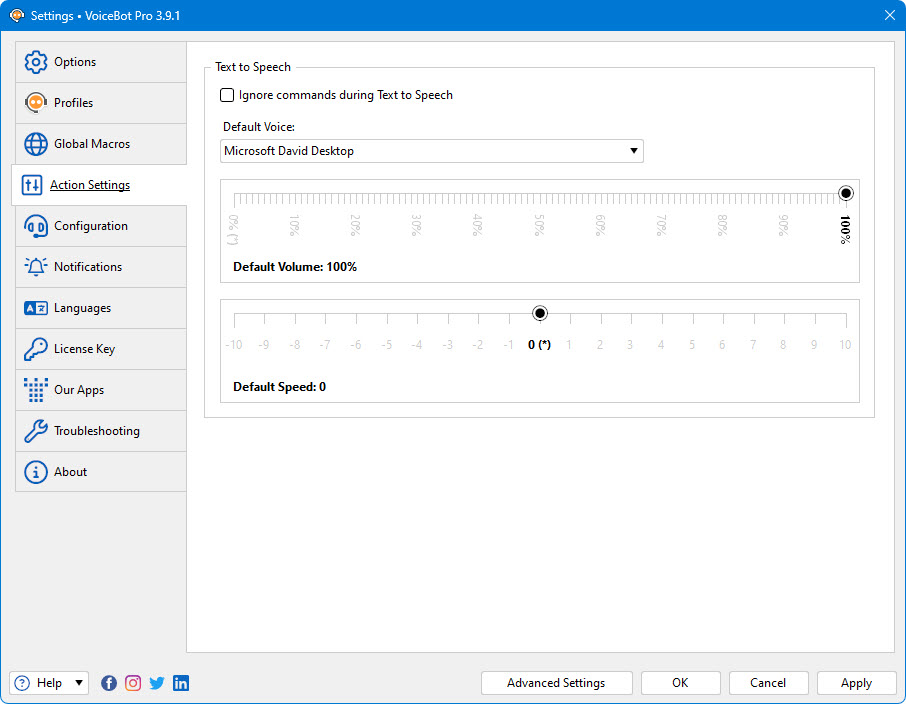
This tab provides settings for configuration of Text to Speech actions.
- Ignore commands during Text to Speech: Enable this option to to prevent VoiceBot from processing commands heard while it is performing a Text to Speech action.
- Default Voice: Select a default speaking voice to use for Text to Speech actions that do not specify a voice to use.
- Default Volume: %: Select a default Text to Speech volume for Text to Speech actions that do not specify a volume.
- Default Speed: Select a default Text to Speech speed for Text to Speech actions that do not specify a speed.
This tab contains configuration options for profile changing, macro execution, and listening settings.
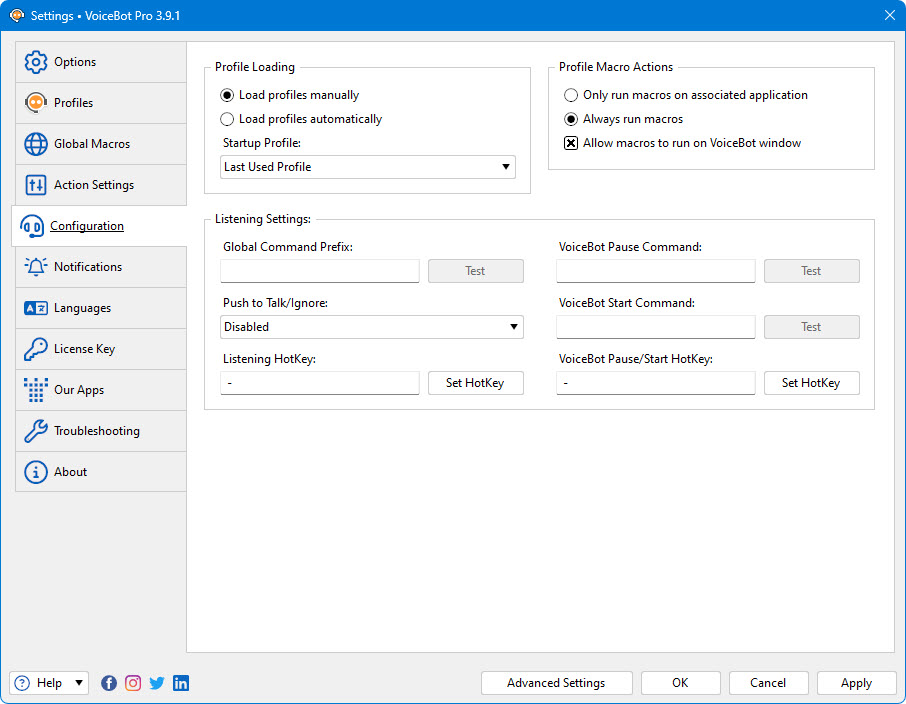
- Load profiles manually: When this option is selected, VoiceBot will not automatically change profiles.
- Load profiles automatically: When this option is selected, VoiceBot will automatically change the current profile based on the currently focused application.
VoiceBot will only load profiles that have a specific filename associated with them. Profiles that have no filename associated or only wildcards (e.g. *.*) will not be loaded.
- Startup Profile: Select the profile that VoiceBot will load when it starts.
- Only run macros on associated application: When this option is selected, VoiceBot will only run macros from the current profile if the currently focused application matches the profile's filename setting.
- Always run macros: When this option is selected, VoiceBot will run macros from the current profile regardless of which application is currently focused.
- Allow macros to run on VoiceBot window: Enable this option to have VoiceBot execute macros when it is the active window.
- Global Command Prefix: Set an optional word or phrase that VoiceBot will listen for at the start of every command, regardless of the current profile.
For example, if the current profile has a macro with the command "stop", and the global prefix is set to "computer", VoiceBot would only run that macro if you said "computer stop".
- Push to Talk/Ignore: Use this setting to enable the use of the Listening HotKey to control VoiceBot's listening status.
- Listening HotKey: Set a HotKey for use with the Push to Talk/Ignore setting above.
- VoiceBot Pause Command: Set a global voice command to pause VoiceBot.
- VoiceBot Start Command: Set a global voice command to have VoiceBot start listening for commands.
- VoiceBot Pause/Start HotKey: Set a global hotkey to toggle VoiceBot's listening for commands.
- Test: Clicking the Test button next to any of the command fields on this tab will allow you to test the voice command to make sure that VoiceBot can recognize it.
- Set HotKey: Clicking this button allows you to set the key combination for the Listening or the Pause/Start action.
This tab provides options for configuring VoiceBot notifications and audio responses.
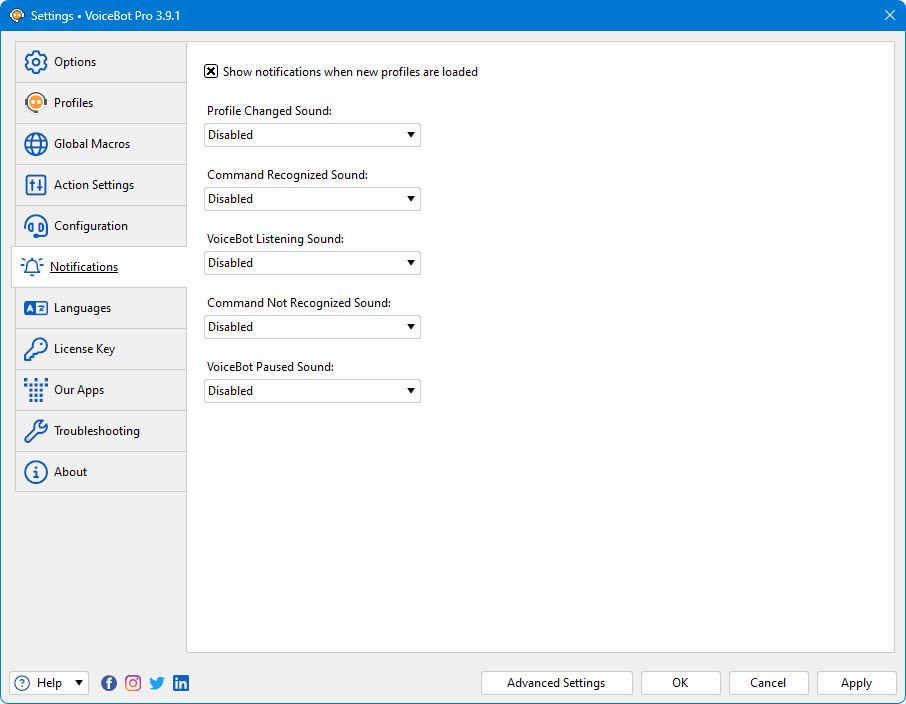
- Show notifications when new profiles are loaded: When this option is selected, VoiceBot will show action centre notifications when a new profile is loaded.
- Profile Changed Sound: This setting configures audio feedback, either text-to-speech or a sound file, when a profile is loaded.
- Command Recognized Sound: This setting configures audio feedback, either text-to-speech or a sound file, when VoiceBot recognizes a spoken command.
- Command Not Recognized Sound: This setting configures audio feedback, either text-to-speech or a sound file, when VoiceBot hears speech but does not recognize an existing and enabled command.
- VoiceBot Listening Sound: This setting configures audio feedback, either text-to-speech or a sound file, when VoiceBot begins listening for commands.
- VoiceBot Paused Sound: This setting configures audio feedback, either text-to-speech or a sound file, when VoiceBot stops listening for commands.
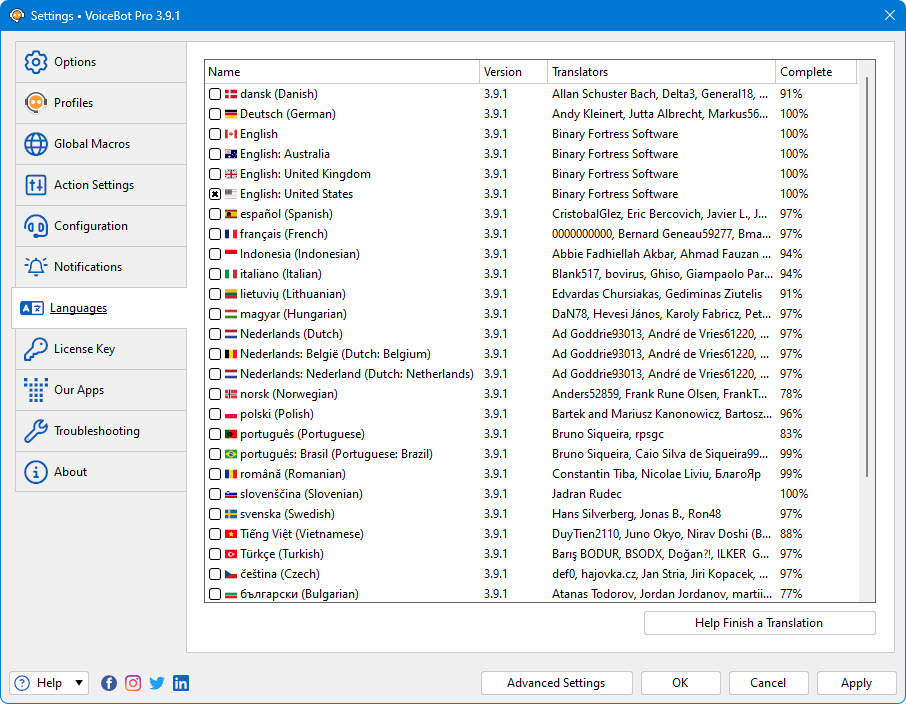
This tab in the Settings window contains a list of all the languages currently installed on your system for use.
- Name: This column shows the name of the language.
- Version: Shows the version for the Language file. This version should match the program version for best compatibility.
- Translators: Shows the contributors for the Language file.
- Complete: What percent complete the language file is.
- Help Finish a Translation: Help us finish a translation and receive a free Pro Standard license in return.
This tab in the Settings window displays your current License key, and allows you to update the License Key or revert to the free version.
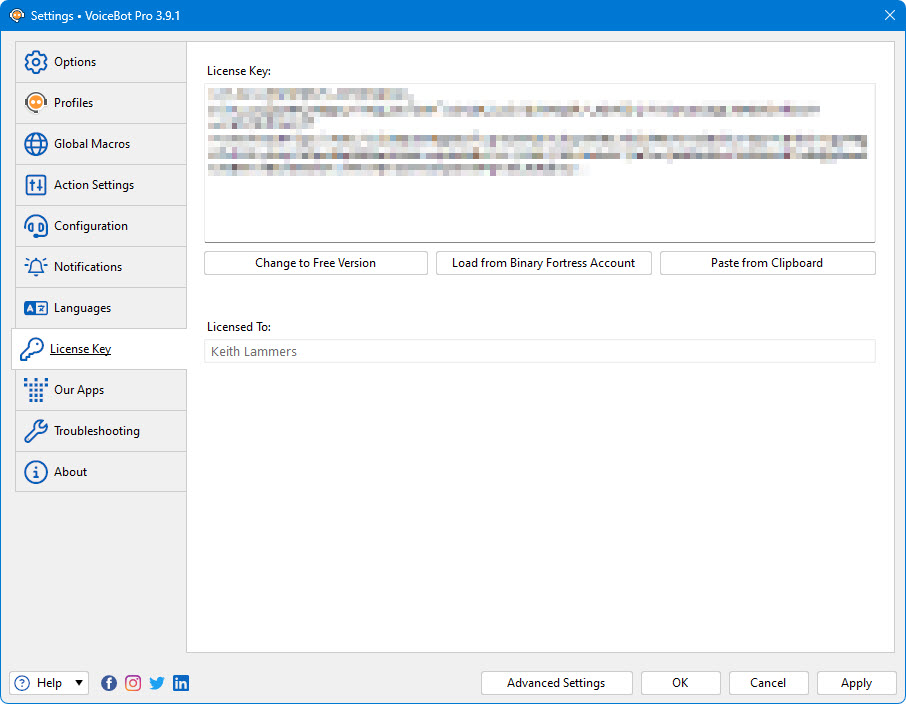
- License Key: The License Key that this application is currently using.
- Change to Free Version: At any time during the free 30-day Pro trial, you can click this button to revert back to the Free version of this application.
- Restore Trial License Key: This allows you to restore a trial license key if it was removed in error and is still valid (within 30 days).
- Load from Binary Fortress Account: Click this button to retrieve and select a license key from a list of license keys tied to your Binary Fortress account.
- Paste from Clipboard: If you have copied your license key from your email, just click this button to automatically paste it into the License Key box.
- Buy a License Key: If you're currently on the Free or Trial version, and you'd like to purchase a lifetime Pro license, click this button to be taken to the purchase page.
- Licensed To: Shows who the license key is registered to, and if it is a Site License key.
- License Expiry Date: If you are using a Trial license, this will show when it will expire.
- Request New Trial License: Click this button to submit a request to the Binary Fortress Software support team for a new 30-day trial license key.
The code editor window allows you to write function code in C# or VB .net. There are scripting API functions available in VoiceBot, DisplayFusion, and ClipboardFusion. If you start typing "BFS." the auto-complete will pop up a list of scripting functions that you can use. You can also use any regular C# or VB .NET code.
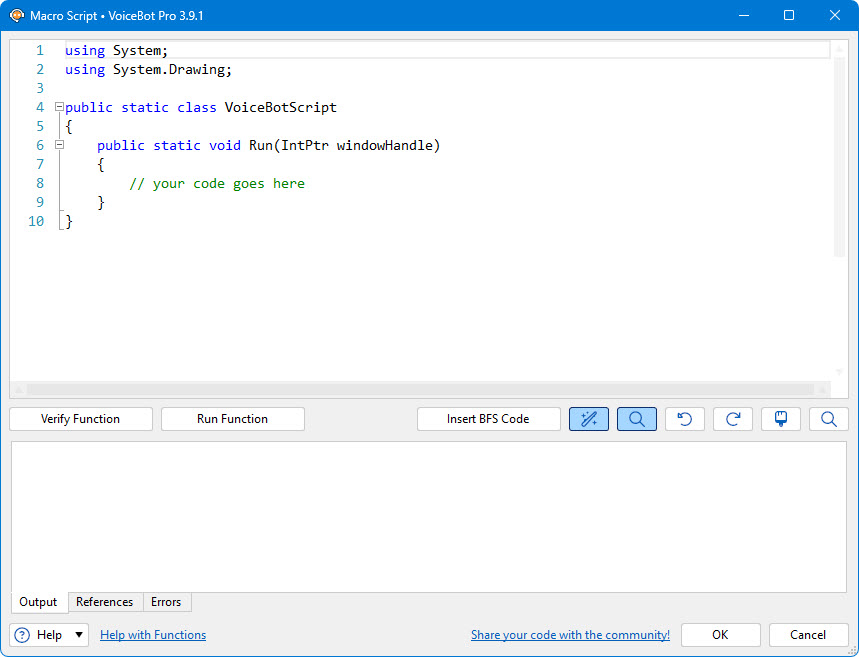
- Name: Enter a name for your macro here.
- Key Combination: This box shows the currently assigned key combination. If it's blank, there's no key combination currently set.
- Language: This drop-down lets you choose between using C# and VB.NET for your Scripted Function code.
- Edit: Click this button to set or edit the key combination assigned to this macro.
- References: Any DLLs that your Scripted Function code requires need to be listed here. For custom DLLs (that aren't in system folders) you'll need to specify the full path to the DLL. To add or remove references, right-click any entry in this pane.
- Undo (Ctrl + Z): Click this button to undo the last code change you made.
- Redo (Ctrl + Y): Click this button to re-do a change that you have just undone.
- Insert BFS Code: Click this button to insert a built-in code function at the cursor location.
- Verify Function: Click this button to verify that the code in the Scripted Function will compile, without running the Function.
- Run Function: Click this button to run the Scripted Function code as-is.
- Share your code with the community: Click this button to submit your Scripted Function to Binary Fortress. We will review the code and post it to the online repository so that other customers can download it.
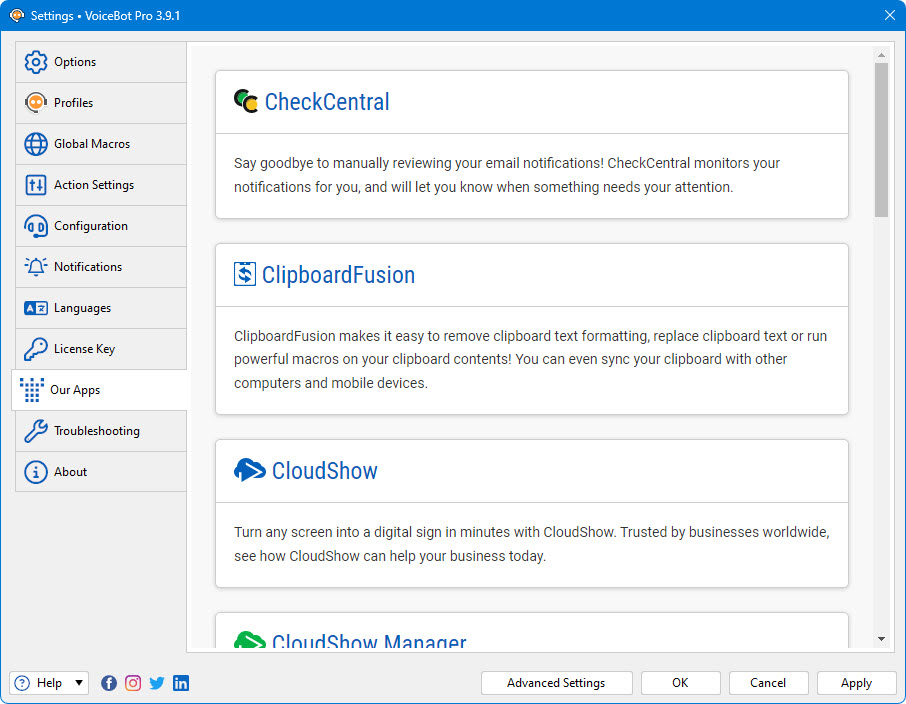
The Our Apps tab lists some of our other popular applications. If you enjoy using this application, feel free to check out our other applications as well!
The troubleshooting tab contains information and options that are only useful for troubleshooting when something isn't working correctly. The text area contains all the information required by Binary Fortress Support when submitting a help request. The button with the blue arrows allows you to refresh the information listed here.
The Logging drop-down list allows you to set the Debug Logging Level. This typically only needs to be enabled when requested by the Binary Fortress support team.
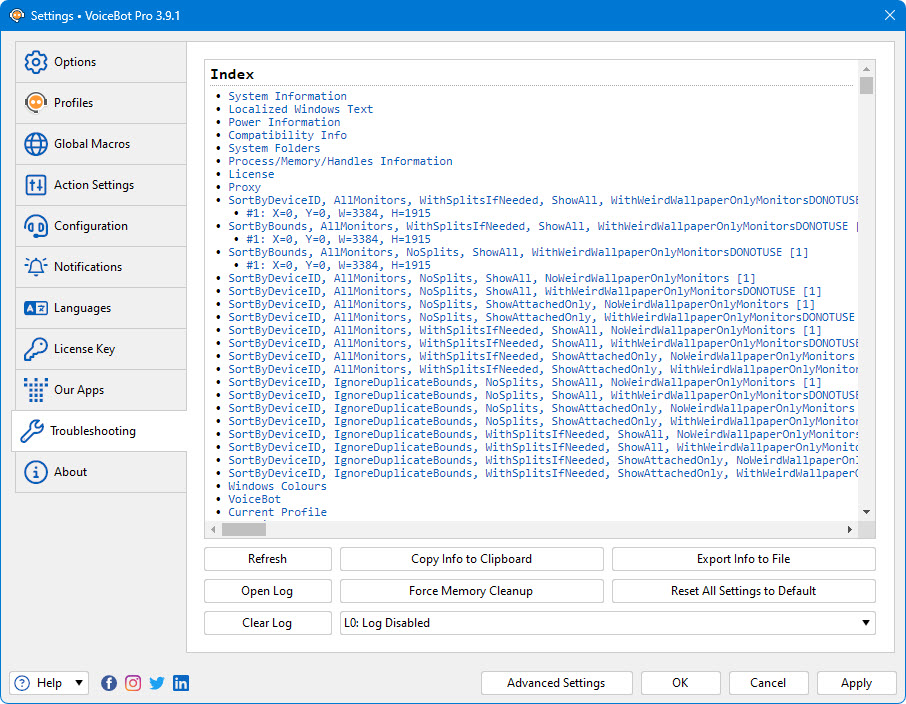
- Open Log: Opens an explorer window to the debug log file's location so you can attach it to an email, or upload it to the support forum.
- Clear Log: Clears the application debug log
- Refresh: Click this button to refresh the troubleshooting info.
- Force Memory Cleanup: This forces the application to pause and do a memory cleanup (a garbage collection) to try and free up any unneeded memory.
- Copy Info to Clipboard: Copies the information from the text area to the clipboard – you can paste this information into an email or forum post by pressing Ctrl + V.
- Log Level: This drop-down menu allows you to choose the logging level for debug logs. L0: Log Disabled is recommended for normal usage. You'll typically only want to enable debug logging to capture a log of a reproduceable issue when submitting a support request.
- Export Info to File: This will open a Save File dialog that will let you save your troubleshooting info to a file.
This dialog allows you to customize to connect to the internet to search for updates or to sync settings and profiles with your Binary Fortress account. This dialog can be accessed via the Internet Connection Settings button on the Options tab.
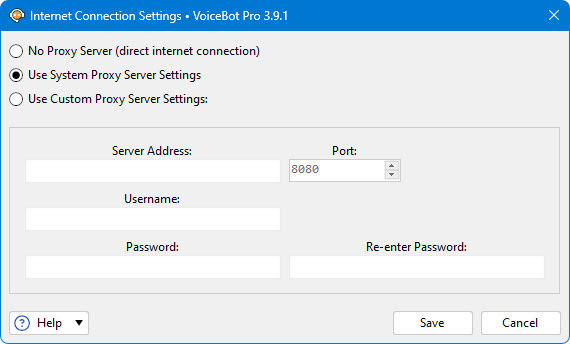
- No Proxy Server (direct internet connection): Select this option if you do not want this application to use a proxy server when accessing the Internet.
- Use System Proxy Server Settings: Select this option to have this application use the proxy settings that are configured in Internet Explorer.
- Use Custom Proxy Server Settings: Select this option if you would like to manually enter your proxy server information.
- Server Address: Enter the proxy server IP address or host name in this text box.
- Port: Enter the proxy server port in this text box.
- Username: Enter the username for your proxy server in this text box.
- Password: Enter the password for your proxy server in this text box.
- Re-enter Password: Re-enter the password (if required) for your proxy server in this text field.
- Save: Save the current proxy settings.
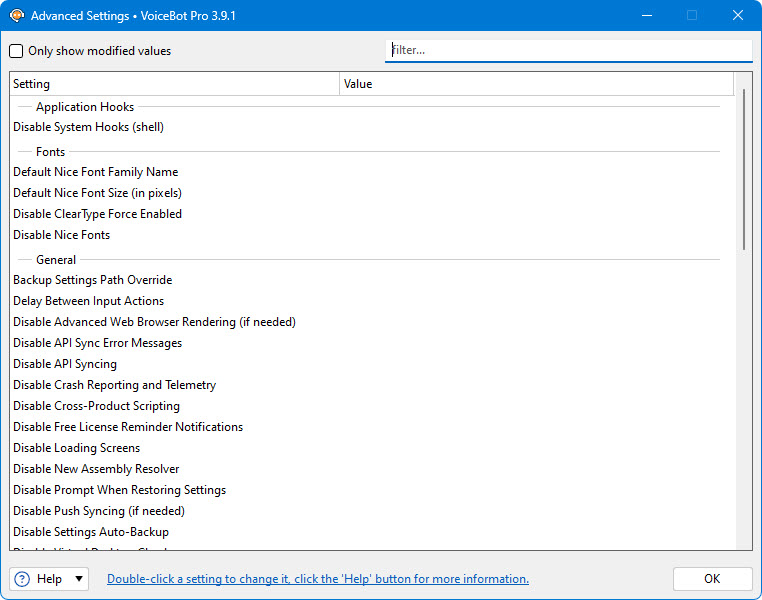
You can use these Advanced Settings to control hidden options. This window is accessed via the Advanced Settings button at the bottom of the main Settings window. For more information on what these settings control, please visit the
Advanced Settings guide.
- Only show modified values: Only show advanced settings that have a value assigned.
- Filter: The filter box allows you to search for advanced setting names. It uses the Binary Fortress Text Query syntax.
- Setting: Shows the category and name of the hidden setting that you can edit.
- Value: Shows the current value, and highlights the setting in red if there is a value set.
- Default Value: Restores the selected setting to its default value.
This window allows you to select from a list of currently running applications, or browse for an application on your computer. This window can be accessed via the Browse button on the Settings > Other Application tab.
- Application: Shows the application's name.
- Path: Shows the application's path.
- Filter: The filter box allows you to search for application paths. It uses the Binary Fortress Text Query syntax.
- Refresh: Click this button to refresh the list of open applications.
- Browse: Allows you to browse and select an application that isn't currently listed.
- Drag this over a window to select that window's process in the list automatically: When you drag this target icon over a window, any information about that window will be filled out automatically, like it's title, or class.
This window is displayed when a new version of the application is available.
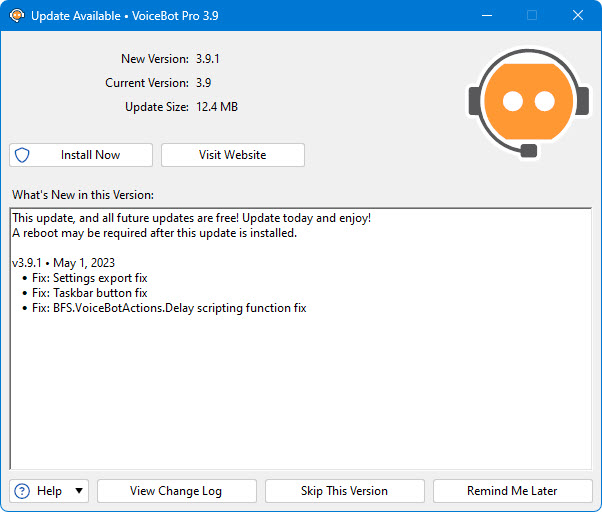
- New Version: Shows the version number of the new version, and whether or not it is a beta release.
- Current Version: Shows the version you are currently using.
- Update Size: Shows the download size of the update.
- What's New in this Version: This shows the changes that have been made to this application since the last time you installed an update. It is a helpful guide to see what new features will be available in the new version.
- Install Now: Automatically downloads and installs the update with only 1 click. (Pro only)
- Install on Exit: Automatically downloads and installs the update after you exit the program, as long as the computer isn't shutting down. (Pro only)
- Visit Website: Opens your default web browser to the application download page so you can download the latest version.
- View Change Log: Opens your default web browser and shows the Change Log. This will allow you to see what has changed since the previous version.
- Skip This Version: Closes the update window, and tells this application to never remind you about this version. Newer versions, and forcing the update check manually using the "Check Now" button will still cause the update window to appear later.
- Remind Me Later: Closes the update window, and allows this application to remind you about the update later.
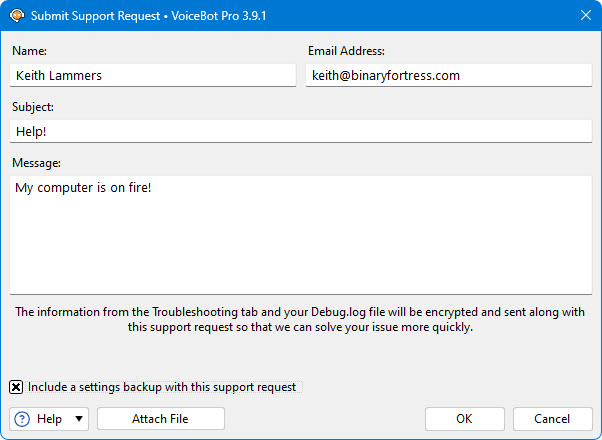
This window allows you to submit a support request, along with your Troubleshooting information and debug log (if debug logging is enabled on the Troubleshooting tab in the settings window). This window can be accessed via the Help dropdown at the bottom left of the Settings window.
- Name: Enter your email address in this text box.
- Email Address: Enter your name in this text box.
- Subject: Enter a quick one line description of your issue in this text box.
- Message: Enter a message explaining the issue that you're running into. If you clicked the Support Request button on an error message window, the error text will also show in this text box.
- Attach File: This will add an attachment to your support request.
- Clear Attachments: This will clear all attachments from your support request.
- Include a settings backup with this support request: Enable this checkbox to send a backup of your product registry Settings along with the support request.